SSR Based Applications
Server-side rendering (SSR) is an application’s ability to convert HTML files on the server into a fully rendered HTML page for the client. It provides various benefits like better page load time, caching, SEO etc
Introduction
The web browser submits a request for information from the server, which instantly responds by sending a fully rendered page to the client. Search engines can crawl and index content prior to delivery, which is beneficial for Search Engine Optimization purposes. Popular examples of server-side rendering JavaScript frameworks include: Angular server side rendering, ejs server side rendering, server side rendering Express, Gatsby server side rendering, NestJS server side rendering, Next server side rendering, React server side rendering, and Vue server side rendering.
Server-side rendering (SSR) is an application’s ability to convert HTML files on the server into a fully rendered HTML page for the client. The web browser submits a request for information from the server, which instantly responds by sending a fully rendered page to the client.
SSR in action
Stages for SSR
- Browser requests a page
- Content visible to the user (because HTML is build on server)
- Browser requests linked JS bundle
- App loads
- User can interact with app
- Request API data
- Re-render app with new data
Whenever you visit a website, your browser makes a request to the server that contains the contents of the website. The request usually only takes a few milliseconds, but that ultimately depends on a multitude of factors:
Your internet speed
the location of the server
how many users are trying to access the site
and how optimized the website is
Once the request is done processing, your browser gets back the fully rendered HTML and displays it on the screen. If you then decide to visit a different page on the website, your browser will once again make another request for the new information. This will occur each and every time you visit a page that your browser does not have a cached version of.
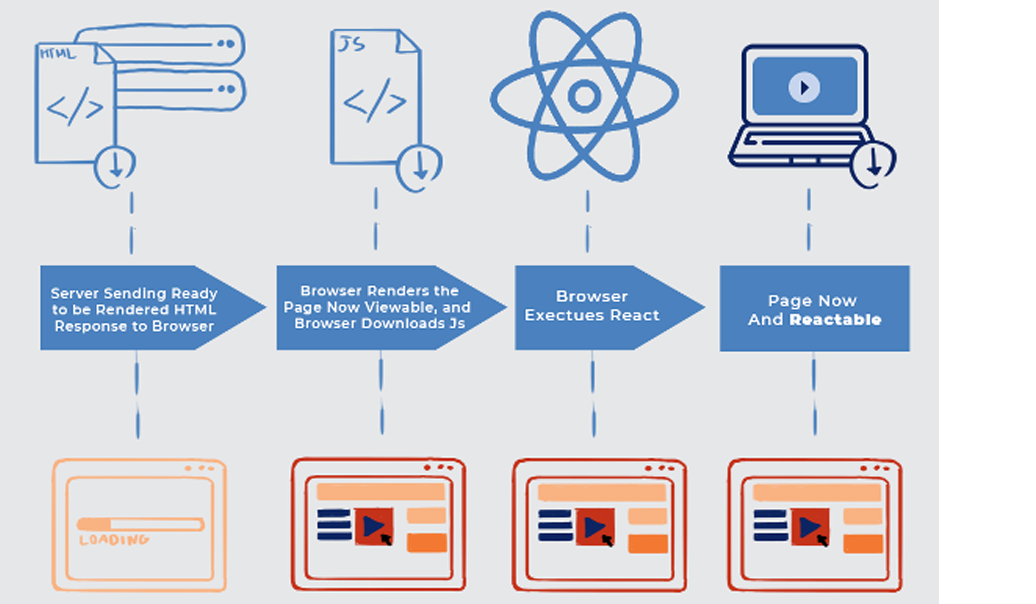
Below diagram explains the steps involved in SSR.

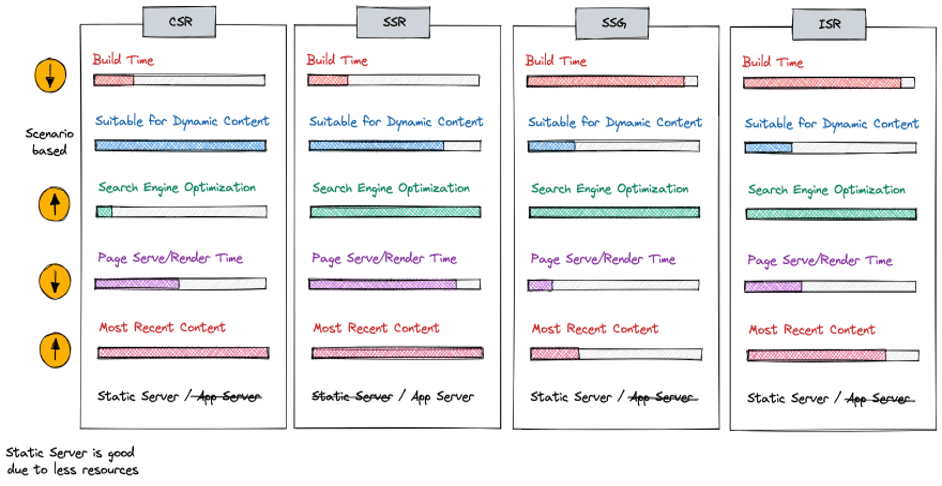
Comparison with Others
| SSR | CSR | SSG | ISR |
|---|---|---|---|
| Each page will initiate a request to App Server, where it dynamically renders and serves full HTML for that page. Since it requests and renders the page each time user requests, page serve time is more than a CSR application.SEO benefits because of rendering at server side | CSR receiving all of the content from the HTML document, content is rendered in the browser using the client-side JavaScript library. The browser does not make a new request to the server when a new page is loaded.Search engine rankings may be negatively impacted as the content is not rendered until the page is loaded on the browser | To avoid the rendering in each request, why don't we generate those files in the build time, so that we can instantly serve the pages when user requests it. | Incremental Static Regeneration (ISR) is the same as Static Site Generation except that content can be rebuilt when the page is updated. |

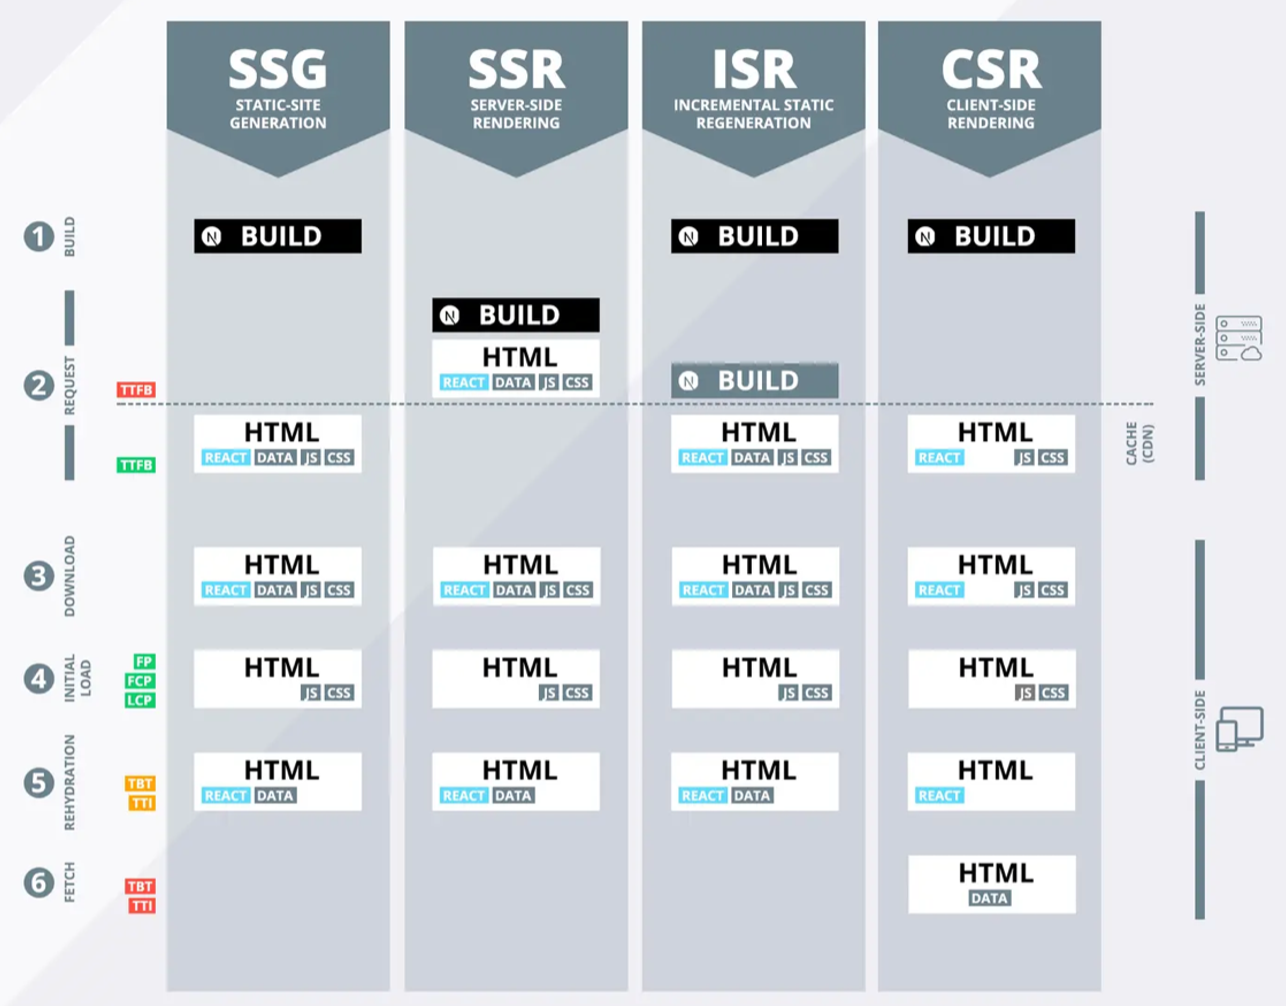
Page rendering with Next.js

SSR Deatils
- Server-side rendering with JavaScript libraries like React is where the server returns a ready to render HTML page and the JS scripts required to make the page interactive. The HTML is rendered immediately with all the static elements. In the meantime, the browser downloads and executes the JS code after which the page becomes interactive. The interactions on this page are now handled by the browser on the client-side. For any new content or new data, the browser sends a request to the server through APIs and only the newly required information is fetched.
You have probably heard of single page applications before. A single page application is an application that is rendered at the client side, even if the data might be fetched from the server.
Server-side rendering (SSR) is the exact opposite of this. SSR describes the process of pre-rendering the page on the server, which is then generated upon each user request. When the pre-rendered page reaches the browser, JavaScript code is run to make the page interactive. This whole process makes the load speed faster. It also makes it easier and preferable to use server-side rendering for applications that depend on SEO.
Pros and Cons
- Pros
- A server-side rendered application enables pages to load faster, improving the user experience.
- When rendering server-side, search engines can easily index and crawl content because the content can be rendered before the page is loaded, which is ideal for SEO.
- Webpages are correctly indexed because web browsers prioritize web pages with faster load times.
- Rendering server-side helps efficiently load webpages for users with slow internet connection or outdated devices.
- Cons
- Rendering server-side can be costly and resource-intensive as it is not the default for JavaScript websites, and the server takes on the full burden of rendering content for users and bots.
- While rendering static HTML server-side is efficient, rendering bigger, more complex applications server-side can increase load times due to the bottleneck.
- Server-side rendering may not be compatible with third-party JavaScript code.
- Rendering server-side may be ideal for static site generation, but frequent server requests and full page reloads can result in overall slower page rendering in more complex applications.
- Reference Links (Cheetsheet, shorthand)
Implemetation Example
SSR Setup –
- Client side configuration
npx create-react-app \<ssr-project-name\>

got to you project and create your component

\*\*instead of ReactDOM.render use ReactDOM.hydrate to indicate to the DOM renderer that you intend to rehydrate the app after a server-side render like

ReactDOM.hydrate(

\<React.StrictMode\>

\<App/\>

\</React.StrictMode\>,

document.getElementById('root')

);
- Server Side Configuration
Creating Express server and rendering – Create index.js
import path from'path';

import fs from'fs';

import React from'react';

import ReactDOMServer from'react-dom/server';

import express from'express';

import App from'../src/App';

constPORT= process.env.PORT||3006;

const app =express();

// ...

app.get('/',(req, res)=\>{

const app = ReactDOMServer.renderToString(\<App/\>);

const indexFile = path.resolve('./build/index.html');

fs.readFile(indexFile,'utf8',(err, data)=\>{

if(err){

console.error('Something went wrong:', err);

return res.status(500).send('Oops, better luck next time!');

}

return res.send(

data.replace('\<div id="root"\>\</div\>',`\<div id="root"\>${app}\</div\>`)

);

});

});

app.use(express.static('./build'));

app.listen(PORT,()=\>{

console.log(`Server is listening on port ${PORT}`);

});

1. **Configure Webpack, babel and npm scripts**

 babelrc.js

{

"presets":[

"@babel/preset-env",

"@babel/preset-react"

]

}

webpack.server.js

const path =require('path');

const nodeExternals =require('webpack-node-externals');

module.exports ={

entry:'./server/index.js',

target:'node',

externals:[nodeExternals()],

output:{

path: path.resolve('server-build'),

filename:'index.js'

},

module:{

rules:[

{

test:/\.js$/,

use:'babel-loader'

}

]

}

};

package.json

"scripts":{

"dev:build-server":"NODE\_ENV=development webpack --config webpack.server.js --mode=development -w",

"dev:start":"nodemon ./server-build/index.js",

"dev":"npm-run-all --parallel build dev:\*",

// ...

},
nodemon is used to restart the server when changes are made. npm-run-all is used to run multiple commands in parallel.
npminstall nodemon@2.0.15 --save-dev

npminstall npm-run-all@4.1.5 --save-dev

Start dev

npm run dev
Projects Example/Case Study
- Ecommerce project – M&S
- Banking